

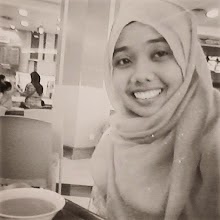


Hello everyone! The picture above is the picture of me and syaoran. Cool! I like this picture so much as my dream to take a photo with Syaoran finally came true! haha
 .. Cut it out Nina! This picture is edited by just using these two programs :
 I like this picture so much as my dream to take a photo with Syaoran finally came true! haha
 .. Cut it out Nina! This picture is edited by just using these two programs :
1. MS PAINT 2007
2. PHOTOSCAPE
Who thought that just by using simple program such MS PAINT, you can edit your picture like this one. I did this editing for about an hour, cut and paste. Not just simple CUT AND PASTE, but - A SMART CUT AND PASTE!
Okay, I show you how I made it
FIRST STEP : CHOOSE A PICTURE

I choose this picture, a picture of me and my brothers. Open the picture using MS PAINT 2007. Okay, here's how the editing starts. First, cut (or crop, it's about the same ) only the section from the picture that you want.
 ) only the section from the picture that you want.

Then, by using the select tool [the one highlighted in orange], select roughly the edges of the picture [ remember, we want to 'delete' the old background and try to make the background turns white] and press the button DELETE from your keyboard.

As I do mine in this tutorial, I select and delete the old background and make it only ME with white background. For the closer ends between the background and my face, I used the eraser tool.

For a better view, click on the magnify tool [it magnified your picture, make it easier for you to erase. Slowly, erased the edges smoothly, to make the picture appear more real.

These all steps applied the same for the second picture [ I choose Syaoran as my second picture]. Cut and delete the background with the same technique.
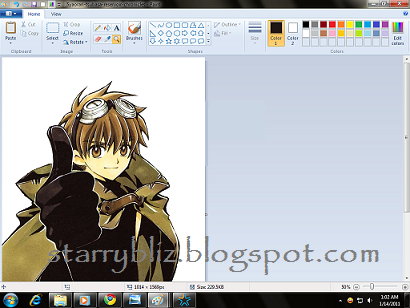
When you have done it, save it in " 24-bit Bitmap (*.bmp;*.bib) " format or "PNG (*.PNG)" format [better if you use PNG].
SECOND STEP : CHANGE THE PICTURE'S DIRECTION
When I made this picture, I noticed that Syaoran's picture is turning on the right side; the same as my picture. So, I change Syaoran's picture to turn on the left side, facing me . Actually, it's depends on which picture you want to change. Either one is okay, as long as you want to make it looks real. To do this, I open the picture of Syaoran with white background [ the one that I had edited in the first step].
 . Actually, it's depends on which picture you want to change. Either one is okay, as long as you want to make it looks real. To do this, I open the picture of Syaoran with white background [ the one that I had edited in the first step].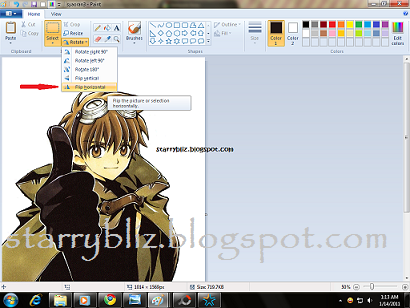
Click on the rotate tool, then choose flip horizontal. You will have like this :

THIRD STEP : MERGING PICTURES
Okay, this step is a bit hard. And I took most of my patience to do this. HAHA! DAM!

First , I open a picture of me that is edited in earlier step and cut only the section that I want that is the face. To 'cut' first select it from the select tool and then go to edit and click cut. At the same time, open the new blank page. Then, click on Edit from the menu bar, and choose paste. I move the picture at the place I want it to be - next to Syaoran.

For Syaoran's picture, I opens the new window of MS PAINT 2007 with Syaoran edited picture. With the same step, cut only the part that I want and paste it next to my picture. Okay, here's the trick for the background. due to the same background colour; that is white, I just click on the fill with colour tool with the colour that I want. In this case, I choose soft yellowish brown.
FOURTH STEP : DECORATING!
I like this part so much. The things left now is just - DECORATING! 


For the logo on above our heads [in this picture] I cut it from the picture I saved earlier, that I got on the internet. Depends on you, how you want to decorate it. The things left now is to let your imagination and creativity gone wild!

Like this one, you can choose the logo that I boxed in red. (Tsubasa Reservoir Chronicle is the anime of Syaoran is in. Kakkoi desu! Worth watching it!)

I drew some feather of wings, the sun and the bird using the crayon tool, creating an effect of drawing and cartoon picture! [And it looks childish, actually. ]
]
 ]
] 
Other than decorate it using MS PAINT 2007, I used PHOTOSCAPE program to add a few effects of drawing.


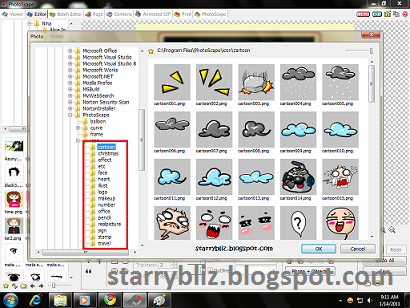
Choose any of these icons and emotions that you like to put on your picture.
And finally, you can have something like these :

Other than this, I made another simple picture of me and Syaoran.

I think that's all that I like to share in this tutorial. Hope to read your comments and feedback. Feel free to ask me if you have question about tutorials or anything about this blog on my formspring or at my shout box.
Ja, matta na, minasan!! 


