Total Pageviews

Sonnet 17

Assalamualaikum w.b.t

Okay, for this post, let's start in Bahasa.

Tahun 2008.

Bermulalah sebuah perjalanan hidup yang baru buat Amanina Abd Sukor apabila dia dipanggil untuk melanjutkan pelajaran ke SBPI Sabak Bernam. Ya, gementar, gelisah semua ada. Apatah lagi, ini merupakan sebuah pengalaman baru baginya untuk menempuh hidup di sebuah sekolah berasrama penuh. Kisah di Sabak Bernam, tak boleh cerita di sini, tunggulah nanti dalam post yang lain, panjang sangat kalau nak ceritaheh he.

Sepanjang 2 tahun di SBPI Sabak Bernam, banyak sangat benda yang dipelajari oleh Si Amanina. Dan sebagai tanda penghargaan kepada semua, ,dengan segala keringat, peluh dan air mata (ada ke air mata? menipu...!=.=') menggunakan sepenuhnya (tak juga) sel-sel didalam otak, maka, terhasillah sebuah poem khas buat rakan-rakannya.


Poem yang diberi nama Sonnet 17.

FAQs :

#1 : Kenapa 17?
Jawapan : Ntahlah,, sebab masa form 5 (waktu poem ini 'dilahirkan') semua umur 17 tahun. Senang cerita, abaikan je la number 17 ituheh he.

#2 : Mana dapat idea buat ni?
Jawapan : Owh.. idea? waktu di tingkatan 3, (semasa bersekolah di SMK SG. CHOH) kawan baik saya ; Aiuny telah 'merosakkan' sebuah poem A Samad Said yang bertajuk "The Dead Crow", yang menyebabkan Si Amanina gelak terbahak-bahak membaca poemnya itu. Poem asal sebenarnya berasal daripada Shakesphere yang bertajuk Sonnet 18.

#3 : Dari mana dapat words ni semua?
Jawapan : hahahahahahahahh!!... sebenarnya words ni semua, daripada korang jugak. Semua idea dan perkataan adalah daripada SBPI SABAK BERNAM itu sendiri. Bermula dengan kawan-kawan kelas 5 Rahmah 2009 hinggalah ke suasana dan persekitaraan sekolah. Setiap satu memori yang tercipta, di abadikan dalam setiap linesalin2. Kepada rakan-rakan saya kelas 5 Rahmah 2009, jangan terasa ye, kalau ade yang terasa, 10 jari disusun, memohon maaf..


4 Rahmah 2008


5 Rahmah 2009

Buat rakan-rakan, si Amanina ni tak tau macam mana nak cakap terima kasih kat korang semua. Banyak sangat benda yang aku belajar daripada korang
=_='. Minta dihalalkan ye segala ilmu...yayaya Dengan cara ini sahaja yang mampu saya lakukan to express these feelings to each one of youhekhekhek.


Special to my dear friend; Arwahyarham Luqman Hakim Zamalolaily,
....
Permergianmu, pastinya dirindui semua, kaum keluarga,guru-guru, rakan-rakan dan mereka-mereka yang mengenalimu..
Terima kasih atas segala ilmu, tunjuk ajar dan bimbingan. Walaupun hanya sempat kenal 2 tahun sahaja, segala kenangan tetap terpahat dalam ingatan dan hati kami sampai bila-bila.

Semoga Allah merahmatimu...

Al-Fatihah

Drawings : Face Expressions!

Hello everyone!peace


In this entry, I'll show you a few drawings, princess that I drew using MS Paint 2007. I drew the basic shape of the princess,


and then made a few copies and change the face expressions, the background and accessories.

A princess with her crown.

A princess with castle background

A sad face of a princess. Poor princessheh he.

This drawing, I add the colour of the princess's skin and add some highlights and shadow.

This drawing, I add a veil on her hair. I love how the veil looks in this drawing. By using the brush tool it makes the veil appear soft and realclaps3.

I merge this 2 drawing together to make it easier for you to see. These 2 drawings are actually the same. I just add on her veil and change the background colour.

These drawings are some of my collections. I'll post more drawings later on.
Feel free to comment. I do appreciate your comments and feedbacks! salin2

Tutorial : Smart Cut and Paste


Hello everyone! The picture above is the picture of me and syaoran. Cool!claps3 I like this picture so much as my dream to take a photo with Syaoran finally came true! hahaahahahahh!!.. Cut it out Nina! This picture is edited by just using these two programs :

1. MS PAINT 2007
2. PHOTOSCAPE

Who thought that just by using simple program such MS PAINT, you can edit your picture like this one. I did this editing for about an hour, cut and paste. Not just simple CUT AND PASTE, but - A SMART CUT AND PASTE!

Okay, I show you how I made it

FIRST STEP : CHOOSE A PICTURE


I choose this picture, a picture of me and my brothers. Open the picture using MS PAINT 2007. Okay, here's how the editing starts. First, cut (or crop, it's about the sameyayaya ) only the section from the picture that you want.
Then, by using the select tool [the one highlighted in orange], select roughly the edges of the picture [ remember, we want to 'delete' the old background and try to make the background turns white] and press the button DELETE from your keyboard.
As I do mine in this tutorial, I select and delete the old background and make it only ME with white background. For the closer ends between the background and my face, I used the eraser tool.
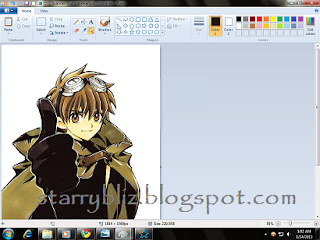
For a better view, click on the magnify tool [it magnified your picture, make it easier for you to erase. Slowly, erased the edges smoothly, to make the picture appear more real.
These all steps applied the same for the second picture [ I choose Syaoran as my second picture]. Cut and delete the background with the same technique.

When you have done it, save it in " 24-bit Bitmap (*.bmp;*.bib) " format or "PNG (*.PNG)" format [better if you use PNG].

SECOND STEP : CHANGE THE PICTURE'S DIRECTION

When I made this picture, I noticed that Syaoran's picture is turning on the right side; the same as my picture. So, I change Syaoran's picture to turn on the left side, facing mehehe. Actually, it's depends on which picture you want to change. Either one is okay, as long as you want to make it looks real. To do this, I open the picture of Syaoran with white background [ the one that I had edited in the first step].
Click on the rotate tool, then choose flip horizontal. You will have like this :

THIRD STEP : MERGING PICTURES

Okay, this step is a bit hard. And I took most of my patience to do this. HAHA! DAM!
First , I open a picture of me that is edited in earlier step and cut only the section that I want that is the face. To 'cut' first select it from the select tool and then go to edit and click cut. At the same time, open the new blank page. Then, click on Edit from the menu bar, and choose paste. I move the picture at the place I want it to be - next to Syaoran.
For Syaoran's picture, I opens the new window of MS PAINT 2007 with Syaoran edited picture. With the same step, cut only the part that I want and paste it next to my picture. Okay, here's the trick for the background. due to the same background colour; that is white, I just click on the fill with colour tool with the colour that I want. In this case, I choose soft yellowish brown.

FOURTH STEP : DECORATING!

I like this part so much. The things left now is just - DECORATING! lalalal~
For the logo on above our heads [in this picture] I cut it from the picture I saved earlier, that I got on the internet. Depends on you, how you want to decorate it. The things left now is to let your imagination and creativity gone wild!
Like this one, you can choose the logo that I boxed in red. (Tsubasa Reservoir Chronicle is the anime of Syaoran is in. Kakkoi desu! Worth watching it!)
I drew some feather of wings, the sun and the bird using the crayon tool, creating an effect of drawing and cartoon picture! [And it looks childish, actually.heh he]
Other than decorate it using MS PAINT 2007, I used PHOTOSCAPE program to add a few effects of drawing.

Choose any of these icons and emotions that you like to put on your picture.

And finally, you can have something like these :


Other than this, I made another simple picture of me and Syaoran.


I think that's all that I like to share in this tutorial. Hope to read your comments and feedback. Feel free to ask me if you have question about tutorials or anything about this blog on my formspring or at my shout box.

Ja, matta na, minasan!! ngee

Related Posts Plugin for WordPress, Blogger...